Custom Function
Selain fitur Search dan Ongkir, Malika Tools juga nyediain fitur Custom Function, di mana kamu bisa nulis kode Python kamu sendiri untuk ngeakomodir use case yang gak bisa diselesein dari fitur2 yang dah ada, tapi secara lebih fleksibel dan skalabel.
Prepare the Code
Sebelum dive deep ngecoba fitur ini, jangan lupa siapin kode kamu ya. Pastikan gak ada error di kode kamu sebelum dibuat webhook khusus untuk itu. Kamu bisa IDE apapun yang kamu mau—Jupyter Notebook, Google Colab, atau bahkan VS Code juga boleh yang penting kodenya Python.
Setelah fungsi kamu siap, kamu hanya perlu fungsi tunggal def tanpa import apa-apa, karena import sudah diatur di bagian Available Modules.
Available Modules
Terdapat beberapa modul yang bisa digunakan di dalam kode kamu. Ada beberapa modul yang built-in dari Python, dan ada modul yang hanya tersedia di Malika Tools ini.
Python Built-in Modules
Tidak semua module disediakan untuk runtime Custom Function ini ya, tapi kamu bisa akses beberapa additional module dari third party seperti:
| No. | Module | Dokumentasi |
|---|---|---|
| 1 | numpy | Dokumentasi numpy |
| 2 | math | Dokumentasi math |
| 3 | base64 | Dokumentasi base64 |
| 4 | pytz | Dokumentasi pytz |
| 5 | collections | Dokumentasi collections |
| 6 | evaluate | Dokumentasi eval |
| 7 | request | Dokumentasi requests.request |
| 8 | re | Dokumentasi re |
| 9 | datetime | Dokumentasi datetime |
| 10 | dt | Dokumentasi datetime.datetime |
| 11 | timedelta | Dokumentasi datetime.timedelta |
| 12 | http | Dokumentasi http |
Malika Tools Modules
Selain itu, ada juga module-module internal milik Malika Tools yang bisa kamu pake. Kamu bisa melakukan pemanggilan modul-modul menggunakan fungsi call(<nama-modul>, <payload>) tersebut dengan cara seperti ini:
# Contoh fungsi untuk search profile Google Sheetasync def contoh():  payload = {    "profile_id": "qhomemart_12345",    "body": {      "query": "selang",      "limit": 10    }  }
# Berupa object dengan key 'message' dan 'result' response = await call("search", payload) return response['result']Lalu, apa saja nama-nama modul beserta payload yang tersedia? Dapat dilihat pada tabel berikut:
Nama Modul | Cara Menggunakan Modul | Isi variabel response |
|---|---|---|
| Melakukan pemanggilan | |
direct_search | Melakukan pemanggilan | |
cek_ongkir | Melakukan cek ongkir dengan API RajaOngkir | |
search_address | Melakukan pemanggilan | |
nearest_location | Mencari lokasi terdekat menggunakan fitur nearest location. Perlu membuat profil Nearest Location terlebih dahulu lalu dapetin ID-nya. | |
gsheet_add_rows | Menambahkan banyak data ke Google Sheet. Perlu membuat Google Sheet profile terlebih dahulu lalu dapetin ID-nya. | |
gsheet_add_row | Menambahkan satu baris data ke Google Sheet. Perlu membuat Google Sheet profile terlebih dahulu lalu dapetin ID-nya. | |
gsheet_upsert_row | Menambahkan atau memperbarui satu baris data di Google Sheet berdasarkan ID. Perlu membuat Google Sheet profile terlebih dahulu lalu dapetin ID-nya. | |
gsheet_upsert_rows | Menambahkan atau memperbarui banyak baris data di Google Sheet berdasarkan ID. Perlu membuat Google Sheet profile terlebih dahulu lalu dapetin ID-nya. | |
gsheet_sync | Melakukan sinkronisasi data Google Sheet dengan database lokal. Perlu membuat Google Sheet profile terlebih dahulu lalu dapetin ID-nya. | |
gsheet_get | Mengambil data dari Google Sheet berdasarkan profile ID. Perlu membuat Google Sheet profile terlebih dahulu lalu dapetin ID-nya. | |
schedule_job_once | Menjadwalkan webhook job yang akan dijalankan sekali pada waktu tertentu. Job akan mengirim POST request ke URL yang ditentukan dengan data dan headers yang diberikan. | |
run_func | Menjalankan fungsi custom function lain berdasarkan function ID. Berguna untuk membuat fungsi yang saling terhubung. | |
Example
Misal kamu ingin membuat fungsi untuk menghitung total harga produk yang rumit dan tidak bisa diselesein sama AI. Pastiin kamu udah nulis dan udah coba dites di lokal. Untuk contoh kodenya kurang lebih seperti ini:
def total(product_price: float, is_java: str, is_cod: str, delivery_cost: float):
  final_price = 0
  if is_java == "True":    final_price = product_price  else:    if(delivery_cost < 50000):        final_price = product_price + delivery_cost/2    else:        final_price = product_price + (delivery_cost - 25000)
  if is_cod == "True":    final_price += final_price * 0.03
return final_priceMore Complex Example
Misal kamu ingin membuat fungsi untuk menghitung ongkir dari kantor Aksoro, yang mana data asalnya didapat dari modul nearest location dari gudang Ebliethos, kamu dapat melakukan hal seperti ini:
async def nearest_ongkir():  # Define the destination first  destination = "Aksoro"
  # Call the nearest_location module  payload_nearest = {    "nearest_location_id": "ebliethos_o77xhq8bsa2teolpf6ek",    "body": {      "query": destination    }  }  response = await call("nearest_location", payload_nearest)
  # Get nearest address then pick the address name  nearest = response['result'][0]["address_name"]
  # Then call the cek_ongkir module  payload_ongkir = {    "body": {      "origin": nearest, # Use nearest address      "destination": destination,      "courier": "jne", # or 'sicepat' or 'ninja' or anything else      "weight": 1000 # in KG    }  }  response = await call("cek_ongkir", payload_ongkir)
  return response['result']
Fungsi tersebut akan mengembalikan hasil seperti ini:
{ "origin": { "province": "Jawa Tengah", "city": "Kabupaten Cilacap", "subdistrict": "Sampang" }, "destination": { "province": "DI Yogyakarta", "city": "Kabupaten Sleman", "subdistrict": "Gamping" }, "ongkir": { "code": "jne", "name": "Jalur Nugraha Ekakurir (JNE)", "costs": [ { "service": "JTR", "description": "JNE Trucking", "cost": [ { "value": 40000, "etd": "4-5", "note": "" } ] }, { "service": "REG", "description": "Layanan Reguler", "cost": [ { "value": 12000, "etd": "3-6", "note": "" } ] }, { "service": "YES", "description": "Yakin Esok Sampai", "cost": [ { "value": 15000, "etd": "1-1", "note": "" } ] } ] }}Mudah bukan? 😁👍
Create New Function
Setelah kodenya sudah siap dan tanpa error, kamu bisa membuat profil/webhook baru di Malika Tools sebagai berikut:
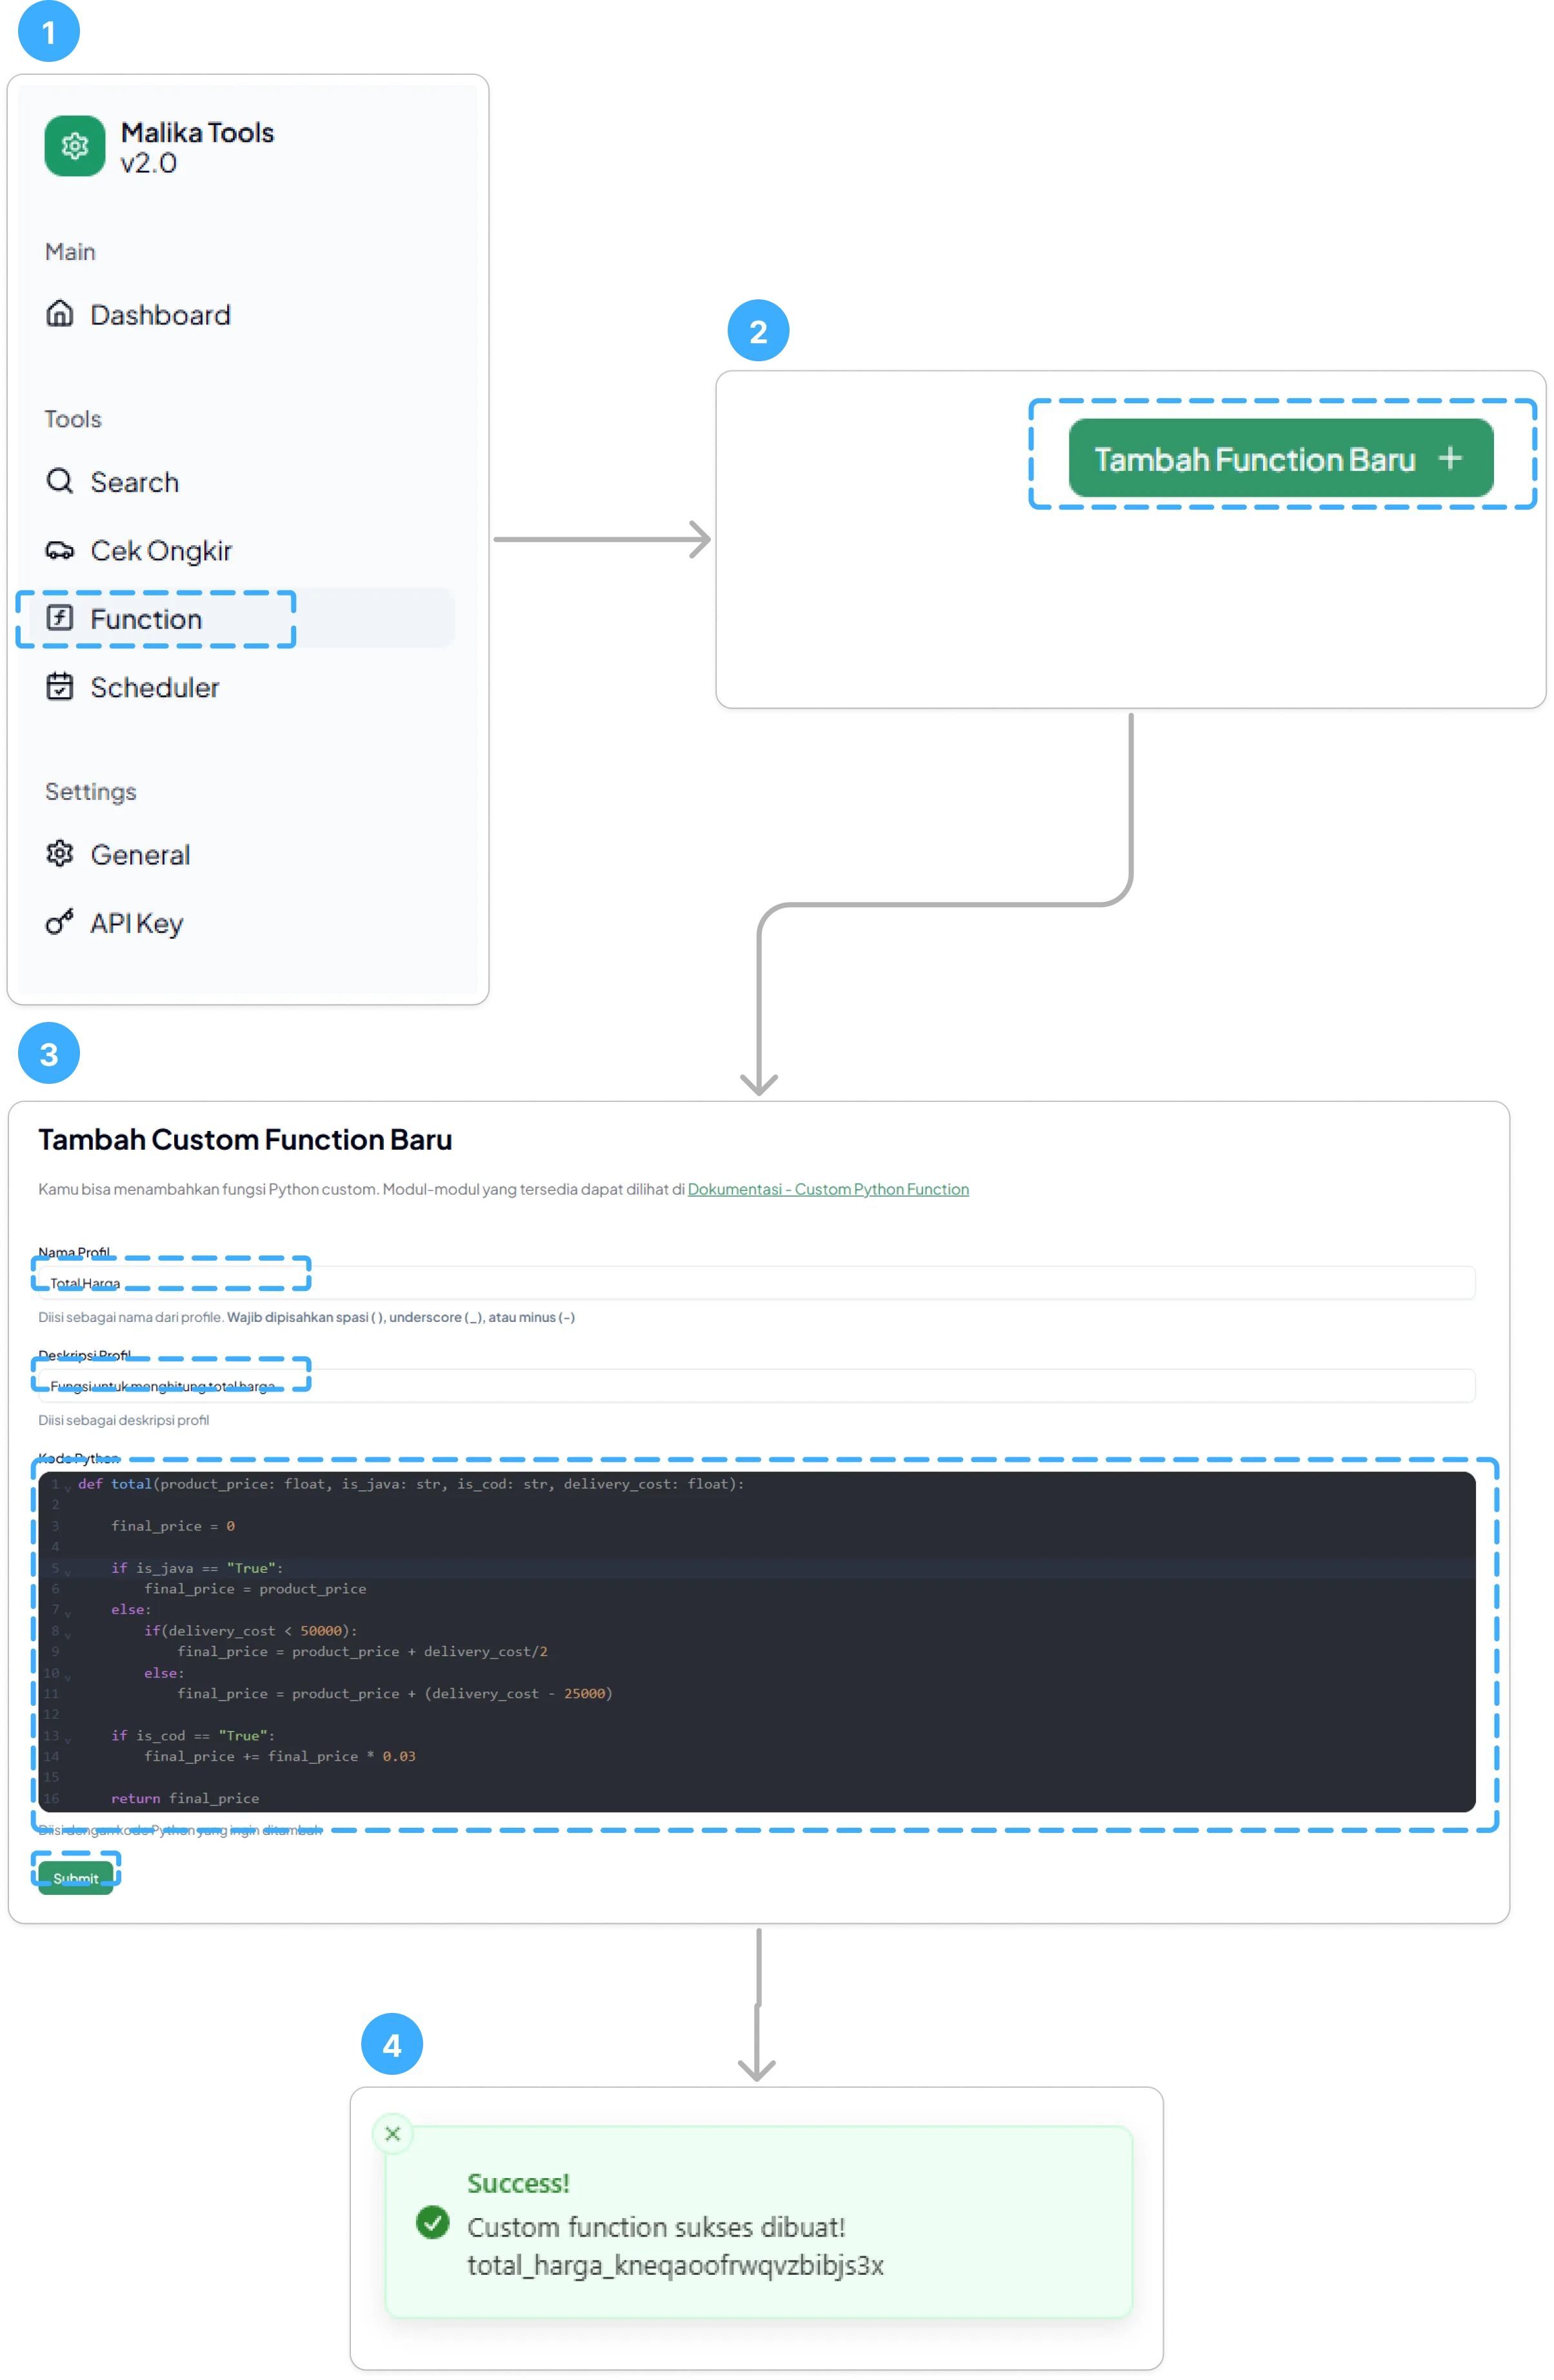
Membuat Profil/Webhook Baru untuk Custom Function
Register the Custom Function Webhook to Cekat AI
Kalau buat kodenya dah berhasil, kamu bisa daftarin profil/webhook baru itu ke Cekat AI lewat fitur Integrations-nya.
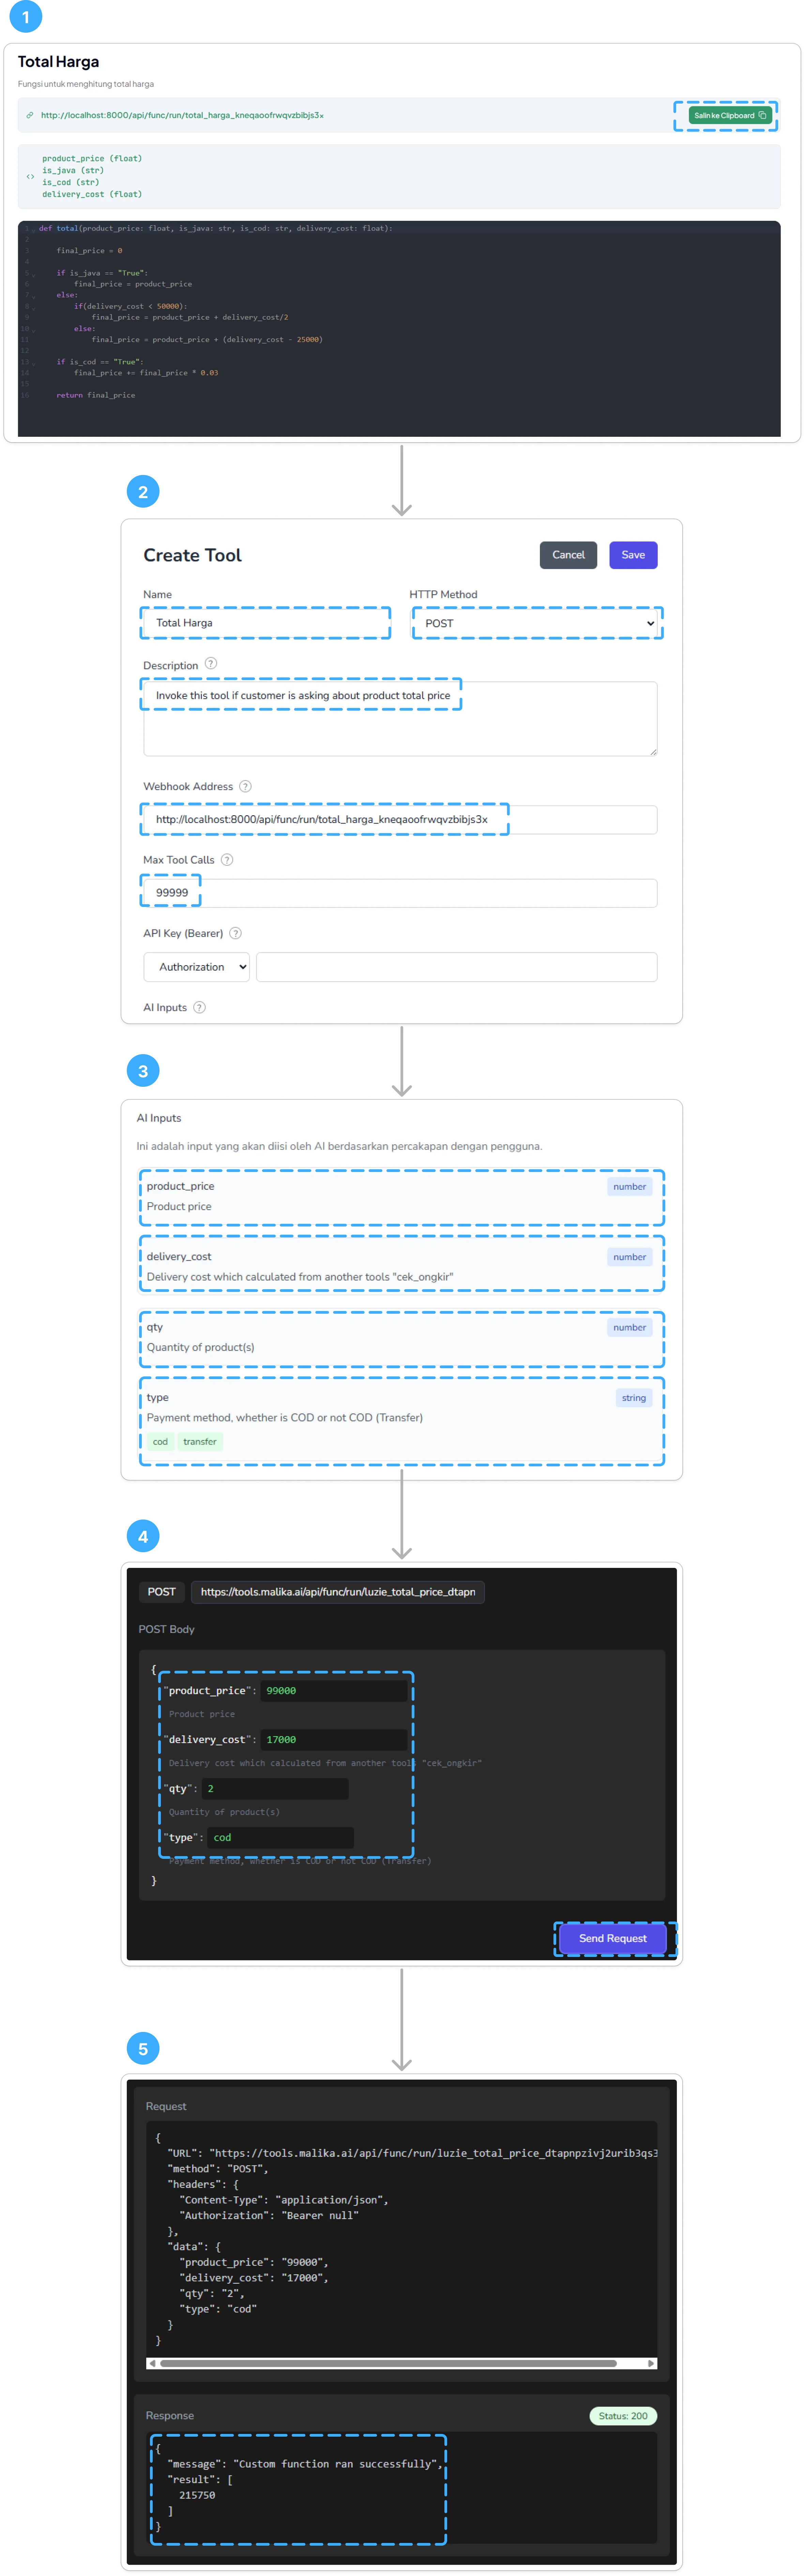
Alur Mendaftarkan Webhook ke Cekat AI
Sebelum di-prompting untuk menyesuaikan terhadap fungsi baru yang udah dibuat, tes dulu apakah fungsinya bekerja dengan baik apa belum seperti yang ada di gambar pada langkah 4 dan 5.
Update and Delete
Terdapat juga opearasi update dan delete fungsi yang sudah dibuat di bagian bawah kanan tampilan.

Update dan Delete Custom Function
Run (New)
Sekarang, kamu bisa langsung menjalankan fungsi di dalam dashboard tools.malika.ai loh! Caranya dengan klik tombol Run di bagian tombol bawah kanan.

Menjalankan Custom Function